Activate AMD Radeon Graphics Card
How to set up an AMD Radeon graphics card and select the right drivers for it in Zorin OS.
Official Radeon Open Source drivers (recommended)
If you have a modern AMD Radeon graphics card (produced after 2012), Zorin OS already comes pre-loaded with the official Open Source “AMDGPU” and “Radeon” drivers. No additional setup is necessary.
These are the recommended drivers for most use cases, including gaming.
Proprietary AMDGPU drivers
You can install the AMDGPU drivers if you explicitly require them for specialized use cases, such as on workstations with Radeon PRO graphics cards.
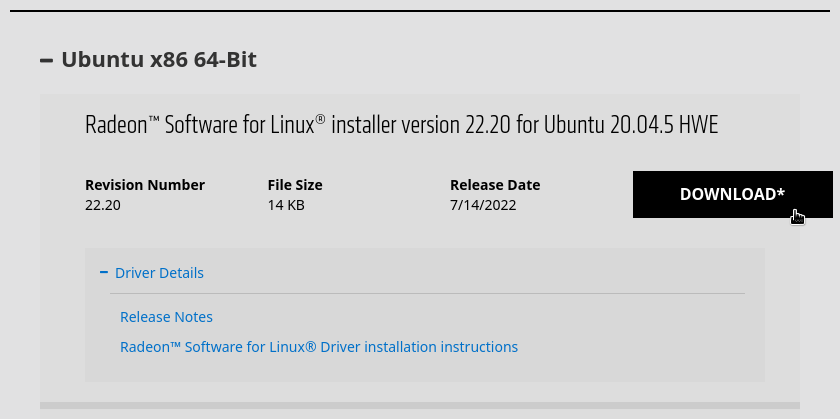
Visit the Linux Radeon Graphics drivers section of AMD’s website.
Find the appropriate drivers for your graphics card (standard “Radeon” or “Radeon PRO”) and download the installer file for “Ubuntu 24.04”.

After the download completes, open the Files app.
Navigate to the “Downloads” folder.
Double-click on the “amdgpu-install_…_all.deb” file.
Click the “Install” button in the new window that appears.
Open the Zorin Menu → Utilities → Terminal.
Enter the following command:
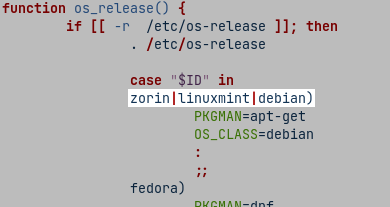
gnome-text-editor admin:///usr/bin/amdgpu-installIn the new Text Editor window, press Ctrl + F and search for
ubuntu.Replace the
ubuntutext on this line withzorin, so it looks like the image below:
Save the file and close the Text Editor window.
Enter the following command into the Terminal to start installing the AMDGPU drivers:
amdgpu-install -yFollow the on-screen instructions to complete the installation.
Restart your computer to apply the changes.
If the AMDGPU graphics drivers are still not activated
Your computer’s Secure Boot feature might be blocking the system from loading the AMDGPU drivers.
- Power off your computer and power it on again.
- Immediately upon start-up, repeatedly press the designated key to open the BIOS/UEFI settings. This key should be indicated on the screen at start-up or in your computer’s manual. If you are unsure which key to press, it is usually either Esc, Delete, F2, F12, or another function key.
- At the BIOS/UEFI settings screen, navigate to the “Boot” or “Security” tab using the ← → keys.
- Make sure that the “Secure Boot” option is disabled. If it’s enabled, scroll down to it using the ↑ ↓ keys and press Enter to set it.
- Press the indicated key to Save the settings and exit the BIOS/UEFI settings screen (usually the F10 key).