Freezing Issues
What to do if the system repeatedly freezes.
On this page
If the system repeatedly freezes when it’s not under heavy load, your computer may be experiencing one of these issues:
- The correct hardware drivers aren’t installed.
- A piece of hardware is defective, especially hard drives or memory modules.
To find the source of the issue and resolve it, please follow these instructions:
Install software updates
Oftentimes, newer hardware drivers or other system-level software are already available to resolve freezing issues on many computers.
- Open the Zorin Menu → System Tools → Software Updater
- Select to install the latest updates.
- Restart your computer to apply the changes.
If this didn’t resolve the issue, please continue following the steps below.
Disable Power Saving Power Mode
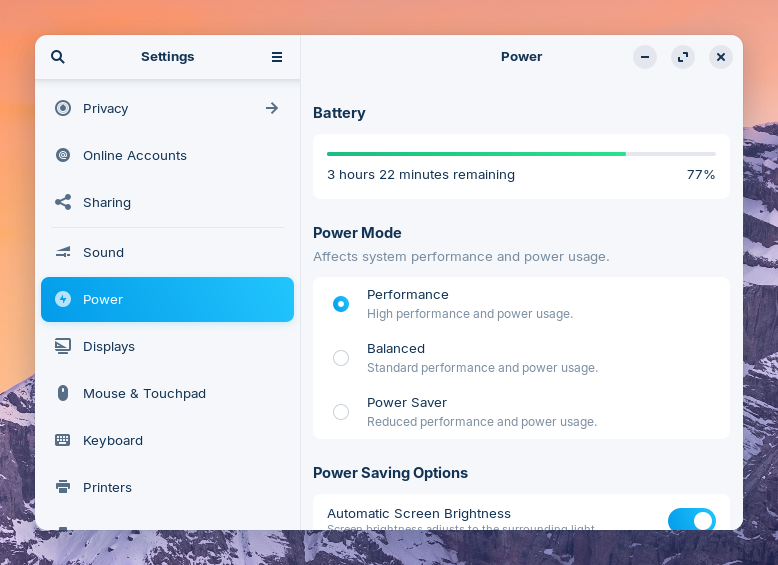
If you previously set the “Power Saving” Power Mode, it may reduce your computer’s performance to conserve battery life. If you’re experiencing performance issues while using “Power Saving” mode, please switch to either the “Balanced” or “Performance” mode by opening the Zorin Menu → Settings → Power and switching to a different option under the “Power Mode” section.

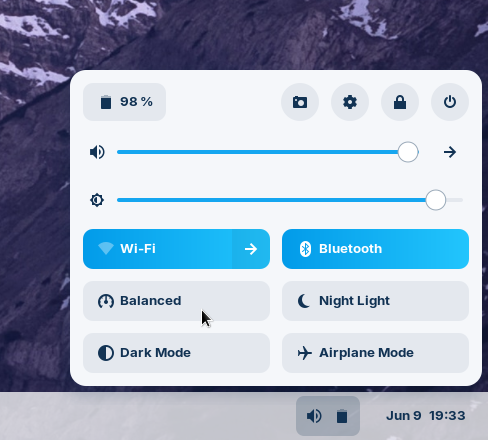
Alternatively, you can toggle between Power Modes by clicking on the indicator icons on the right side of the panel to open the indicators menu.

Activate NVIDIA graphics drivers
If your computer has an NVIDIA graphics card, installing its official driver software may resolve the freezing issues.
View how to activate NVIDIA graphics drivers ›
Run a memory test
You will need to determine how much memory / RAM your computer has before running the memory test.
Open the Zorin Menu → Settings.
Navigate to the “About” panel in the left sidebar.
Look for the item marked “Memory.” It should have a number beside it, such as 16 GB, though it may be 15.5 GB or something similar. This is because some of the memory is used up by the operating system itself.
Once you know the total amount of memory, round up to the nearest whole number, then subtract 4. Take note of this new value.
Close all running apps.
Open the Zorin Menu → Utilities → Terminal.
Enter the following 2 commands into the Terminal to install the memory test software:
sudo apt updatesudo apt install memtesterRun the memory test by entering the following command in the Terminal. Replace the # character with the value you determined in step 4.
sudo memtester #G 3
This will test most of your memory (leaving enough for the system to operate) for 3 cycles and will report back any errors it finds.
If errors are found
It appears that there are physical defects with the RAM hardware module(s) in your computer. This is often caused by wear and tear over time.
You may need to replace the RAM module(s) in your computer to avoid system instability and freezing.
Check the computer’s hard drive / SSD for errors
Before performing a hard drive check, you’ll need to determine which type of drive you have. You can do this by checking the hardware specifications for your computer’s model. Modern drive types include SATA or NVMe.
Check a SATA or M.2 drive for errors
- Create a bootable Zorin OS USB Install Drive by following these instructions ›
- Boot from the USB Install Drive by following these instructions ›
- Select the option to “Try Zorin OS”.
- After reaching the desktop, open the Zorin Menu → System Tools → Disks.
- Select the hard drive from the left sidebar.
- Click the ⋮ three-dot button in the top right corner of the window.
- Press “SMART Data & Self-Tests…” in the menu.
- Click “Start Self-test” and choose the Extended test.
This test takes a few hours to run and will give you a large amount of information about the health of the drive.
Check an NVMe drive for errors
NVMe drives can’t be checked with a SMART Test through the Disks app. However, you can use the software package nvme-cli for this by following these steps:
Create a bootable Zorin OS USB Install Drive by following these instructions ›
Boot from the USB Install Drive by following these instructions ›
Select the option to “Try Zorin OS”.
After reaching the desktop, connect your computer to the Internet.
Open the Zorin Menu → Utilities → Terminal.
Enter the following 2 commands into the Terminal to install the required software for the test:
sudo apt updatesudo apt install nvme-cliEnter this command to list the NVMe drives in your computer:
sudo nvme listTake note of the mount path for each drive under “Node”. For example, if the path is “/dev/nvme0n1”.
To access the smart-log of that mount path, enter this command:
sudo nvme smart-log /dev/nvme0n1
If errors are found
It appears that there are physical defects with the hard drive / SSD in your computer. This is often caused by wear and tear over time.
You may need to replace the hard drive / SSD in your computer and re-install Zorin OS to avoid data loss, system instability, and freezing.